A Foolproof Digital Workflow System for the Professional Real Estate Photographer
Post Production Backup System for Architectural and Real Estate Photographers
Having a Foolproof Digital Post Production Backup System for Architectural and Real Estate Photographers is essential. Below, is a detailed look at the Workflow & Post Production system we use at our studio. Been doing it the same way for about 10 years now.  It takes a minimal amount of preparation with a big pay off in time savings and off-site backup redundancy.
Iâm a huge believer in getting it right at capture. Itâs taken me a few years to really tune into light quantity and quality, both available and additive.  After all, photography is writing with light.  Purely from a standpoint of capture, if your exposure is dead on, thereâs not much retouching to be done.  Near-prefect capture equals less time spent in Adobe Lightroom and Photoshop. With that said, itâs taken a few years of trial and error to create this workflow system. Periodically it gets tweaked a bit but hasnât changed much with the exception of PhotoMechanic and Adobe upgrades and the advances of off-site Cloud storage.
Calibrating Your Monitor
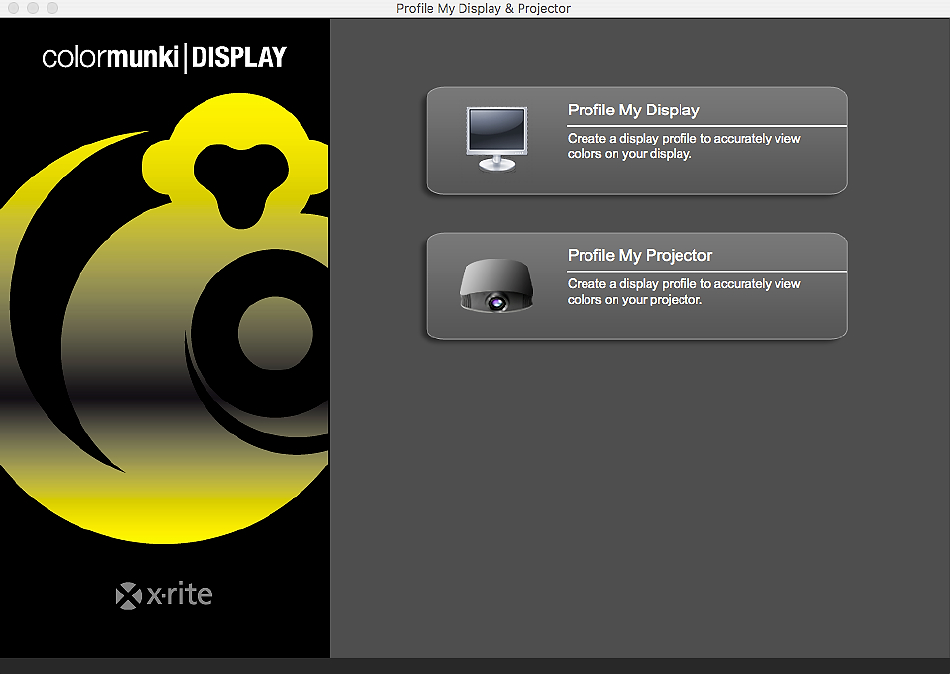
No workflow system would be complete if you are using out of the box color and do not calibrate your computer monitors. At my studio, we use a X-Rite’s Color Munki Display to calibrate a MacBookPro 15â³ laptop and an iMac i7, 27â desktop.  If you are not using a calibrated monitor you’ll most likely have trouble with getting color and density correct for your clients, especially when your work goes to print. People often ask me how I get such great color in my photographs.  Answer:  Start with a correctly calibrated monitor.  The Xrite people are great to work with and their customer service is phenomenal.
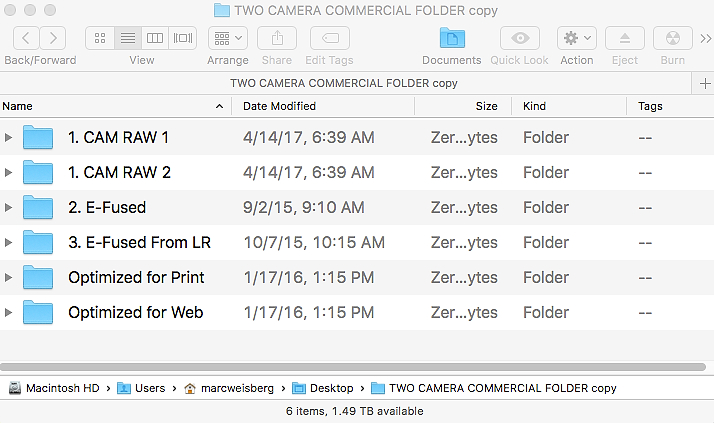
 Folder Hierarchy System
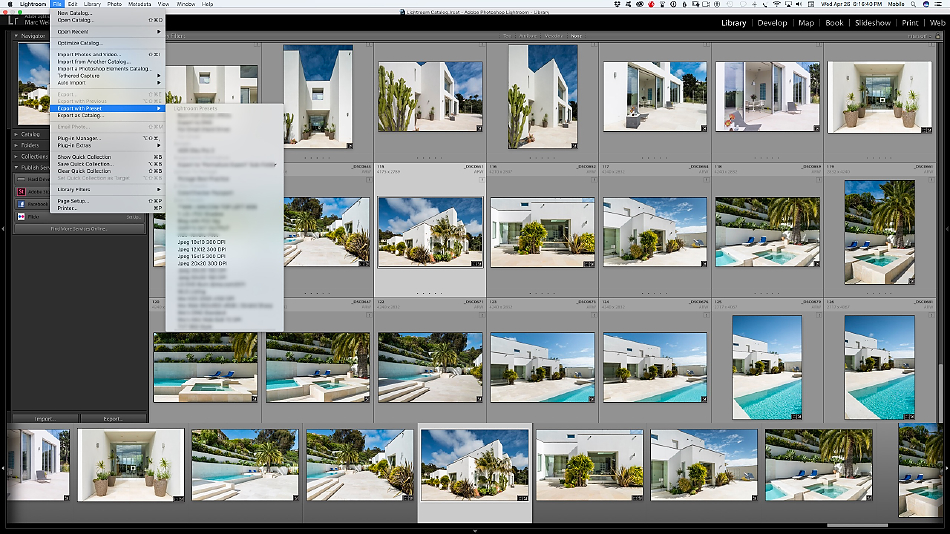
Create a Master folder. Â At my studio, Iâve created Master folders for architectural and luxury real estate photography See the screen shot below Each time a shoot is downloaded onto a machine the folder is duplicated and re-labeled with the date first and then the client’s name: Â 2017.04.25 Westfield_ Century City.
Organizing Your Shoots and BackUp X4
During a given year, 2015, 2016, 2017, a Master Folder is set up for each year with folders nested organized inside denoting the shoot date and client name. See the screen shot below.  As a redundant measure, we use G-Tech drives in the studio to back up all our work:  2tb drives and 8tb Thunderbolt Raid drives.  These drives stay in our studio, are bullet proof drives, highly dependable, quiet and easily removed and stored in my offsite garage when full. They cost a more than a LaCie but are worth it IMO.  Peace of mind and reliability trumps price.  For portable backup drives I use 2tb portable  G-Tech drives. I’ve been using their drives for over 10 years and have never had one fail on me.Â
âA fool-proof system creating 4 backup copies for every shootâ
Furthermore, all shoots are backed up to two Cloud services, Backblaze and DropBox. The method described above generates four copies. One on the local desktop hard drive. The second copy on the G-Tech Thunderbolt. The third copy on DropBox. A fourth copy is backed up overnight onto Backblaze. This method is a fool-proof system creating 4 reliable backup copies for every shoot. If one fails you still have three backups to rely on.
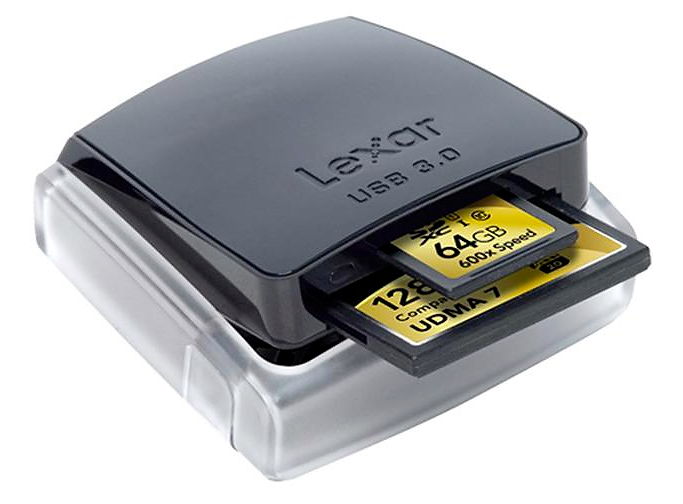
Ingesting Your Images
For ingesting images, we use a Lexar USB 3.0 SD/CF card reader. Â All captures are RAW, and the ingesting process moves surprisingly quickly. Â
Culling â PhotoMechanic
The Ultimate Professional Workflow Tool  Software on the Planet!  Period.
Culling images is fast and easy with Photo Mechanic.  This $99-dollar program is amazing.  Drag and drop a single file or a file folder onto the icon and Photo Mechanic creates a temporary catalog of images.  PhotoMechanic is folder specific and will pull all images from a single folder and create a visual catalog.  One of the features I enjoy most about PhotoMechanic is its ability to display and email almost any type of file, RAW, JPEG and PSD files with great speed. If I could change one thing about PhotoMechanic it would be that a catalog could be saved.
Other features make this my go-to-culling-software are:  a) It is color space specific. Meaning that PhotoMechanic will show you true monitor profiled color and you can run inside the color space or calibration space that youâve specified for your monitor.  b) PhotoMechanic makes it possible to easily email just about any file type quickly and easily, one at a time or several at a time, in a range of sizes and also includes the capability to watermark your images. Great for client soft copy approval-proofing. c)  File transfers, from one folder to another is drag and drop and wicked fast.  d)  Culling is simple and accomplished by numeric key color coding and/or a star system.  e) On-line documentation is easy to understand.  f) Key Wording and Metadata is simple and fast.  g) The File Renaming feature is lightning fast and can be applied to one or several files at the same time.  h)  PhotoMechanic allows for Tabbed Viewing, making is easy to cull, view or sort through multiple jobs.  Honestly, there are over a hundred features that make this IMHO the best, fastest and most reliable image browsing software on the planet.  At my studio Photo Mechanic is used every day, for every job that we shoot.  It is an essential part of our workflow.
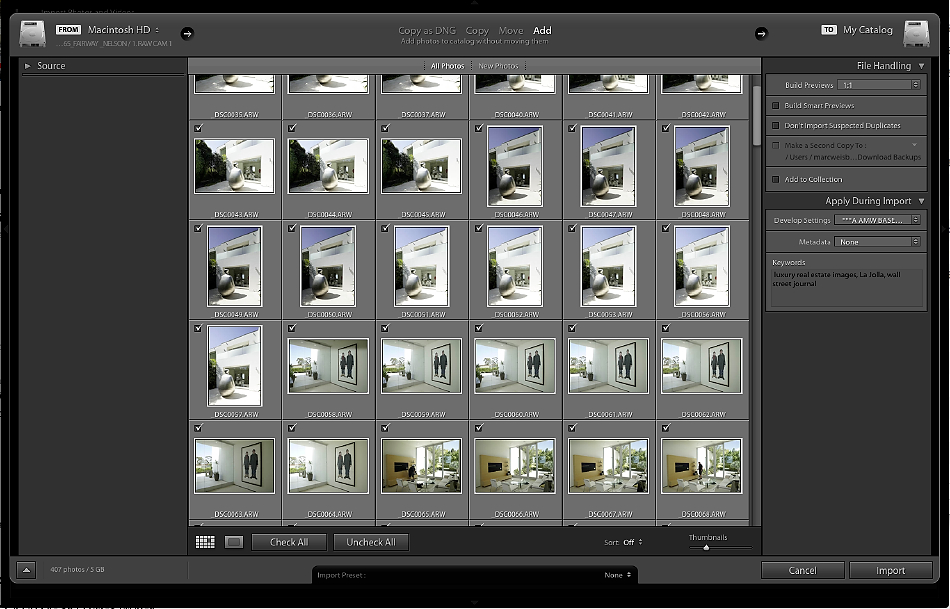
Screenshot of Photo Mechanic with some keepers from a recent Luxury Real EstateShoot

Â
Getting Ready for Adobe Lightroom CC to Import  Images
After culling images and renaming them in Photo Mechanic, they are ready for import into Adobe Lightroom CC.  At this point, you can apply a Develop Module Preset to your images or decide to import them as is. I have a âBase Layerâ Preset which bumps color and saturation, clarity and blacks. Iâve also created a âBase Layer V2â which applies the aforementioned Base Layer Preset plus a Lens Profile.Â
Importing a folder of RAW files into Adobe Lightroom CC Â
Notes: When importing a shoot into LR-CC weâll apply a specific Develop Preset to the shoot.  Applying a given preset will give an overall âauto-tweakâ to the RAW images imported. At the same time the RAW files are imported into LR-CC, XMP sidecar files (these are the data files that store all the little visual tweaks that youâll be making to your RAW files) are automatically generated in the same folder as the RAWâs.  Youâll find this setting in LR at the far left, top of menu bar labeled Lightroom –> Catalog Settings –> Metadata –> all the boxes under Editing are checked.  Generating the XMP files allows us to move the RAW folder to any drive while keeping all the metadata changes with it:  Exposure, density, white balance etc.  Due to the size of the RAW folders (in giga bytes anywhere from 1gb-60gb) after the shoot is completely processed and backed up at least three times on external drives and Cloud storage, the RAW files are removed from our local machine.
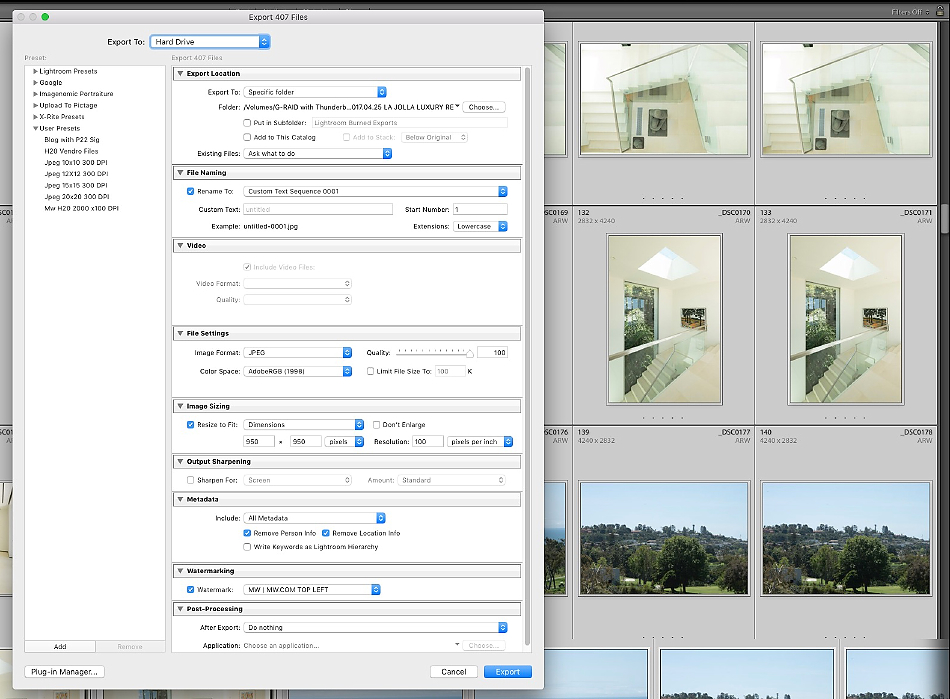
Adobe Lightroom CC Export
After tweaking, exposure, white balance & density, minimal sharpening and general fine tuning of the RAW images in LR-CC (files are renamed if necessary) starting with the clientâs name, a space, and a numeric starting at 0001, for a second time to create a sequential order. Typically, some images have been deleted during the tweaking process hence the renaming. Images are then exported. One set of images at 20â³ @ 180 DPI on the longest side in Adobe 1998 color space, Optimized for Print. Another set is sent the Optimized for Web folder. The Optimized for Web images is output at 2000pxls and 100 DPI in sRGB Color Space with minimal sharpening for the web. For our workflow, this works perfectly for a few reasons. Unless we are printing really large, the 20â³x 20â³ is perfect for up to a 16â³ X 20â³ print. If we need to output larger, weâll go back to the original RAW file and output as close to the print size as possible. Some labs will require sRGB color space instead of the Adobe 1998 color space. This is easily taken care of when exporting from Adobe LR CC. Simply chose sRGB:  in Adobe LR-CC, got to File –> Export –> File Settings –> Color Space –> chose the drop down menu and choose you desired color space.
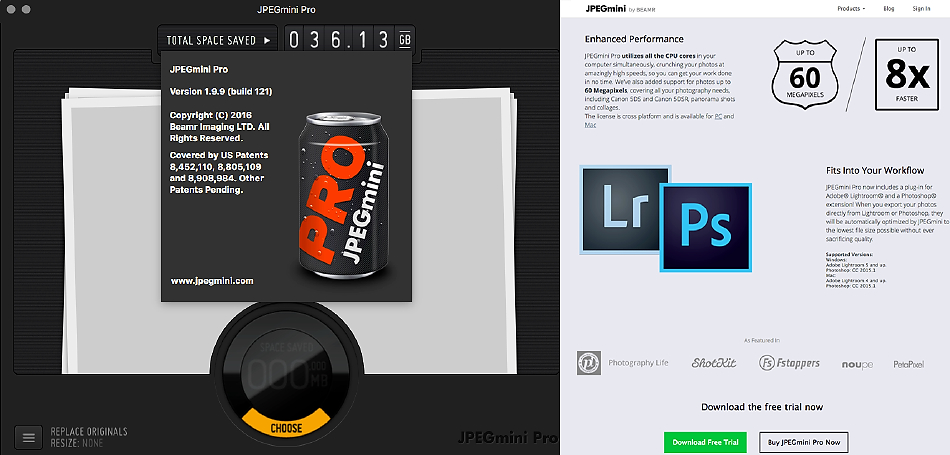
Added Bonus â JPEGmini ProÂ
“Cut file sizes with NO visible loss, Save drive space, Speed up file transfer rates.”
Over the last year, Iâve been using JPEGmini Pro. The software is amazing. In a nutshell.  Drag and drop your final images into JPEGmini Pro and the software will cut your file sizes just about in half with no visual data loss at all.  Don’t take my word for it.  Download the software and take is for a test drive.  Itâs been tested with printed image files side by side, and there is no discernable difference at all. How do they do it? Be damned if I know. But it works and it works well.
Why do this? What is the advantage?Â
Less data, quicker upload transfer rate to the Cloud. Quicker download transfer rate for your clients. Caveat/Warning: Be aware the JPEGmini Pro will replace your original files. Make sure to make a copy of your originals {just duplicate your file folder or finished images} and use then run the duplicated folder through JPEGmini Pro. This way youâll be able to archive both the original images and the duplicate file folder run the JPEGmini Pro.
Be Religious About Backing Up Your Work
“Donât fool yourself into thinking that your drive is new and it wonât bite the dust.”
After each shoot is taken through the full production process {Ingesting/Photo Mechanic/LR-CC} we do a double back up.  One complete copy is stored on a local G-Tech Thunderbolt drive, another on DropBox and a third backed-up overnight on Backblaze.  Donât fool yourself into thinking that your drive is new and it wonât bite the dust. Drives are mechanical they all bite the dust!  Even if you have an SSD Drive, it can still die on you.  Better to be safe than sorry.  SD cards are never re-formated until an offsite double backup is performed.  At this point, there are three copies.  One on the laptop or desktop, another on the Thunderbolt drive and a third on DropBox. After we have three copies, the RAW files and the XMP data files are deleted from the local machine.  The reason for this is to preserve hard disc space.  Iâm very comfortable with 2 complete copies of RAW and XMP files.Â
Final Thoughts
Workflow systems are like opinions and elbows, everyone has one, or at least I hope they do.  More likely they donât have a repeatable foolproof workflow â post production and backup system. I hear photographers complain all the time that they donât have a system that is streamlined.  Too often we all hear stories about photographers that have lost a client job or a lifetime worth of work because they lacked a foolproof backup system. I think whatâs made our workflow a bit different is that itâs been tried, tested and perfected over several years. In 2007 we were an early adopter of  Adobe Lightroom. LR has eased the studioâs workflow, streamlined post production and saves us 100âs of hours of computer face time. I still see many photographers working in Adobe Camera RAW instead of Lightroom.  The Fool Proof Workflow system is a highly organized system that is both easy to implement and is easily taught to a studio manager or intern. It has redundancy and safeguards built into it. It is an easily repeatable system.  To start a new job all you need to do is duplicate the Master folder with its nested contents into a given year of production, re-title the folder with the date and clientâs name and you are ready to go.Â
Â
Â
Â
Â
Â